I love all things pickled. Now that my garden is in full swing I have a TON of zucchini (and weeds, grass and now squashbugs). I always grow zucchini, it is easy, freezes well to add to soups, bread, etc. Last summer with my last harvest of zucchini I made pickles. Wow. Love. I have been wishing ever since that I had made pickles with the very 1st zucchini I picked last summer. The zucchini stays firmer than cucumbers and you don't have to wait 7 days after canning to eat them. They are good in just 3-5.
Zucchini Pickles
make 6 pints
6 medium zucchini, sliced
3 cups apple cider vinegar
4 cups water
3 tbsp kosher salt (you can do less if you want, I like them a little salty)
1 bay leaf
2 cloves of garlic, peeled and smashed
2 tsp black peppercorns
3 tsp dried dill
1 tsp red pepper flakes
Pack zucchini into pint jars along with a sprig of fresh dill and 2 garlic cloves per jar.
Brine:
add all ingredients except zucchini to pot, simmer on medium low for 10 min then bring to rolling boil. Pour boiling brine over zucchini and seal. Process (I don't process my pickles). Wait 3-5 days before eating.
There is one thing I have no shortage of- dandelions. Everywhere. A few years ago after sharing my corn cobb jelly with my neighbor, Miss Mary, she brought me a dandelion jelly recipe. She said she knew I liked the strange ones and thought this would be right up my alley. My sweet neighbor was right. The jelly is bright, floral and delicate.
A little side note on Miss Mary- she is 89 years old, walks 1 mile every day, volunteers for Meals on Wheels taking food to as she says "old folks", gardens and bakes, goes to church every Wednesday and all day Sunday, won't eat white flour, and swears by natural herbal supplements to keep her healthy. One day she called me and asked me to bring my camera. When I got there she wanted me to take a picture of a sweet potato that was larger than a 1 gallon paint can. Impressive.
Dandelion petals and water
Dandelion Jelly
One quart of dandelion flowers, with stems and green part removed
2 quarts water
Juice of one medium lemon
Zest of one medium lemon
1 pkg no sugar needed powdered pectin
4 cups sugar
Rinse dandelions, boil petals in water for 3 minutes or longer for darker color, cool and strain retaining the tea, add lemon juice, zest and pectin, stir to combine, bring to boil, add sugar, continuing to stir until starts to thicken, pour in sterilized jars, seal and process for 5 minutes.
Last weekend was the deadline for Food 52's Tart Challenge. I had never submitted a recipe before but the stakes were higher this time with a trip to the Martha Stewart Show. The challenge was for a sweet or savory end of winter tart. I really wanted to use ingredients that were seasonal, local and readily available to everyone. My other goal was to incorporate some of my canned items from last year. My submission was Almost Spring Lemon Chicken Gallette(click here for full recipe). I used puff pastry for the shell and it included chicken, brussels sprouts, onions, walnuts, feta cheese all tossed in the real prize of this challenge, Lemon Curd Vinaigrette. While my tart was not chosen as one of the finalists, I am very pleased with my discovery of this dressing/marinade.
Lemon Curd Vinaigrette: 3 tablespoons lemon curd 1/4 cup olive oil 1/4 cup white wine vinegar 1 tablespoon water 1 clove of garlic, minced fine 1/4 teaspoon kosher salt 1/4 teaspoon freshed cracked black pepper
Whisk all ingredients until mixed well, refrigerate. Makes 1 cup.
As I am trying to use up my canning creations from last year I am acquiring a pile of canning seals that I know have to be good for something. At Christmas I saw some one was decorating them and using them as present tags. I thought about doing that but I ran out of time and motivation. Wind chimes? Nah. Coasters? Nah. Garden markers? YES!
Last year we planted 5 different types of corn. Some were for drying to mill, some were for popping corn, some were to eat. We did not mark any of it. My husband thought he remembered what was planted where. But as we were eating chewy tough corn we realized that he was confused. So we definitely need to mark everything this year.
My kids love Nutrigrain bars. Love them. Read the label. Not good. Looked at the organic fruit bars at Trader Joe's and other groceries and thought (as a good DIY girl does) "I can make those." I must confess this is not my recipe. But it really is just perfect the way it is. No need to tinker with it. The best part is that I have all of the ingredients on hand at all times.
AND there is a bonus! In making the fruit bars I used up 5 half full jam jars from the refrigerator. I did one pan of cranberry/pear/peach/scuppernog bars (delish BTW) and one pan of lime curd (also yummy just not as weird). Did I mention that I am a canning addict? I am. I have what seems like a thousand jars of jam that I made in 2010. Spring is around the corner and before I know it it will be time to pick strawberries which means MORE JAM. So I plan to make a pan of these a week and try to reduce the number of jars in my larder to make room for the new ones.
Ingredients
1 cup rolled oats
1 cup whole wheat flour
2/3 cup brown sugar
1/2 teaspoon baking soda
1/2 teaspoon salt
1/4 cup oil
1 egg
1 teaspoon vanilla
1/4 cup apple juice
10 ounces jam (apricot, blackberry, blueberry, raspberry, strawberry, or apple butter)
1 tablespoon water
Directions
Combine oats, flour, brown sugar, baking soda, and salt in a bowl and mix thoroughly.
Add the oil, egg, vanilla, and apple juice, and mix with a spoon or a mixer.
Press 2/3 of the mix evenly into a greased 8x12 pan.
Mix the jam with the water, and spread evenly over the mix.
Crumble the remaining oat mixture over the top, and bake at 325 degrees for 30-40 minutes or until golden brown.
My Dad works in a town in North Georgia that calls itself the "Apple Capital Of Georgia." After talking to people that have lived in the area their whole lives my dad found the secret to buying local apples. There is an orchard that sells apples wholesale as well as retail in their market. But the secret is that you can buy seconds (or irregulars- think outlet shopping) for $.14 a pound. YES- FOURTEEN CENTS! So I am now on my second 25 lb box of apples. The first box I canned apple pie filling and and apple-onion-ale relish. I found this recipe over at Punk Domestics. The relish is amazing on a grilled ham and sharp cheddar cheese sandwich. After trying different recipes and trying different ingredients this is my favorite pie filling recipe:
18 large apples
2 1/2 cups brown sugar
1 stick of unsalted butter
2 tsp vanilla
1 tsp cinnamon*
2 Tbsp water
1/2 cup Amaretto*
*I also made a batch that substituted these 2 ingredients for ground ginger and Grand Marnier plus the zest of one orange.
Peel, core, and slice apples- I love my Apple Master. Put apples, sugar, butter water, vanilla and cinnamon to a large pot, bring it to a boil and make sure all ingredients are well incorporated, reduce heat to low, add amaretto and simmer another 5 minutes. Pack in jars and process in water bath for 20 minutes.
I have been going back through my notebook that I keep in the kitchen where I write new recipes. The funny thing is that I did not even realize I was writing recipes. Sounds kind of silly but I just keep a notebook in the kitchen to jot stuff down as I am concocting my masterpieces without realizing that these notes and scribbles were actually recipes. So anyway, I want to share a few with you from time to time and would love some feedback on them.
Cranberry Pepper Jelly
5-8 serrano peppers, halved & seeded, leaving the seeds from 1 pepper
1 1/2 cups cranberry juice
1 cup vinegar
3-5 cups sugar, you can use more or less depending on your taste
1 pkg no sugar necessary pectin
Chop peppers and combine with cranberry juice and vinegar
boil then reduce heat
cover & simmer for 10 minutes
add sugar
bring to a boil, add pectin, boil one more minute, ladle into hot jars, seal and process 20 min
Marinated Banana Peppers
1/2c apple cider vinegar
1 cup red wine vinegar
3 cups water
2 tbsp sugar
2 tbsp kosher salt
garlic clove and bay leaf per jar
sprig of fresh basil and fresh oregano per jar
Cut banana peppers in rings or strips and pack into hot jars along with bay leaf, garlic clove, basil & oregano
Bring 1st five ingredients to a boil then pour over peppers, seal jars
Process in water for 10 minutes.
Sweet Pickled Lemons- I love to snack on these or you can use in your favorite cocktail or water
5 lemons sliced thin, pack into hot jars
Bring the following ingredients to a boil:
1 1/2 cups sugar
1/2 cup rice vinegar
1/4 cup white vinegar
2 tbsp kosher salt
2 tsp ground ginger
1 1/2 cup water
Pour over lemons, seal jar, process 5 min. Let stand for 7 days before eating. This makes 1 pint.
I love canning. No, I really do. It is something that wish for all of my friends to try. It is an amazing feeling when you open a jar in December that you packed back in July and the contents are yummy. Summer in a jar.
Most of my friends assume that it is some sort of voodoo or magic that is involved in canning and preserving food. However, there are just a few steps that require just a teeny weeny bit of science and some love.
The most basic method for canning is the Boiling-water method. All you need for this method is canning jars, new lids, rings, a towel, and a big pot of water. For your first canning experience use a simple jam recipe.
1. Sterilize your jars in boiling water. This is absolutely the most important part of canning. Have the towel folded in half next to your stove. Turn off the water. Using tongs or jar lifter remove jars from water and place on towel. Throw the lids in the water- do not boil these it will ruin the sealing compound.
2. Fill the jars with your recipe leaving a ½” of headspace(space from top of food to top of jar) at the top. Do this while the jars are still warm from sterilizing.
Wipe the rim of the jar so that you can create a tight seal. Top with hot lids and rings-do not screw on too tight.
3. Process your packed jars in your pot of water making sure that jars are covered with 1” of water. You can use a canning rack inside your pot or just place a few extra rings under the jars so that the water can circulate all around. Process your jars according to the directions in the recipe. Don’t tell the USDA but I do not process pickles. I don’t like the mushy texture of the pickles after processing and I feel very confident that they are safe because of the acidity and the salt. I am not recommending that you skip the processing step when canning pickles, just letting you know;)
4. Let the jars cool on the towel or move to a wire cooling rack. As the contents cool a vacuum is created in the headspace and the lid will make a ping sound letting you know it is sealed. When you press on the lid it should not move. If it does a tight seal was not created. Its okay though- just put the jar in the fridge and eat it in a few days. Label the jars immediately so that you don’t forget what is in that lovely little jar. Don’t tell the USDA but I do not process pickles;)
Once you get the hang of this you can start playing around and finding new and exciting recipes. The most important advice I have is DO NOT BE AFRAID TO FAIL.
This post was originally published as a guest post on Tightwad.
This would not be cost effective for me because lemons do not grow well here (some day I will live in a place where I can walk out to the backyard and pick a lemon or lime for my cocktail). However, I have friends in other parts of the country that talk about having more lemons than they know what to do with them so this is for them.
Lemon Pectin Extract Taken from Preserving In Today’s Kitchen (1992)by Jeanne Lesem (Winner of The James Beard Awards)
Seeds and coarsely ground white pith of 5 to 6 large, thick-skinned lemons, about 1.5 lbs, or the equivalent weight in small lemons
3 tbsp citric or tartaric acid (citric acid also called sour salt can be found in spice section, tartaric acid is sold at wine making supply shops)
6 quarts water
Remove and discard zest (I would never discard, see Chocolate and Zucchinni Roasted Lemon Zest Powder), leaving the white pith. Squeeze lemons, reserving seeds, pulp and pith (save that lemon juice for Canning with Kids Strawberry Lemonade Concentrate). Grind the pulp and pith coarsely and measure, should be 2 cups packed. Place this, the seeds and 1 tbsp tartaric or citric acid and 2 quarts water in a straight-sided 4 quart sauce pan. Let stand, uncovered, for 2 hours, then measure the depth of pan’s contents and note it. Bring mixture to a boil over medium heat, stirring often. Boil rapidly until reduced by half, this will take an hour. Pour extract through strainer or colander lined with 4 thickness of damp cheesecloth into a bowl with at least 2 quart capacity. Return pulp to sauce pan, add another tbsp of acid and 2 more quarts of water and repeat cooking process until it has been reduced by half. Then repeat a 3rd time with remaining acid and water. Each step should reduce faster than the original hour. After 3rd step put pulp in clean 2 thickness bag of cheesecloth and let sit without squeezing for several hours until you have a total of 6 cups of pectin extract. Refrigerate is using in the next few days or freeze for longer storage.
Food In Jars is having another giveaway. This time she is giving away a Ball Canning Discovery Kit. This is a great kit for anyone just getting into canning or to give to a friend that is interested in starting. Go over and check it out and read some of her older posts for inspiration.
I just got the newest issue of Family Fun magazine and like the big canning nerd that I am, I got really excited when I saw this article:
Inspired by the popular (but not recommended) practice of boiling camp food in ziplock bags, we came up with an ideal variation: jar meals. These simple dishes are prepped, cooked, and eaten in canning jars with lids and rings. They're ideal for rustic dining because each camper can assemble her own meal and cleanup is minimal. Plus, kids will have a blast customizing dishes to their own tastes. Check out our recipes for jar-made omelets, burritos, and cupcakes.
How It's Done
1. Line the bottom of a large pot with extra jar rings (this keeps the jars from touching the bottom), fill it one third full with water, and bring the water to a boil.
2. Coat the inside of each jar with cooking spray. Have each diner add ingredients and prep his jar meal as he likes it.
3. To move the jars into and out of the water, use a pair of canning tongs or elbow-length oven mitts.
4. After your jar meal is cooked, let it cool a bit, then slip a cut-off sock top around it to serve as a holder. Be sure to tell diners to handle the jars with care.
5. Save the leftover boiled water for washing the jars after the meal.
I was reading Tightwad's latest post and it made me think about my favorite uni-tasker. For those of you that know and love Alton Brown you know what a uni-tasker is. It is a kitchen gadget that serves one purpose and none other. I have purchased a few uni-taskers and have later put them in the donation pile or pawned them off on some one else. One such item was the Pampered Chef Avocado peeler. It really does nothing all that significant, even for the avocado. I still keep it around for getting muffins out of the tin (still just one task even if it is a different one).
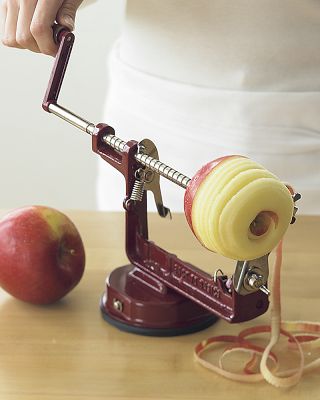
Last fall my father-in-law brought me 3 pecks of local apples. I was thrilled. I cut and sliced and peeled all of those lovely apples to make pie filling, apple butter, etc. Then the next weekend he brought me another 2 pecks AND The Apple Master. I had seen these things before and had previously assumed it was a superfluous device. I was completely mistaken. This machine peels, cores, and spiral slices a whole apple in just a few cranks. The kids were mesmerized and immediately craving apples sliced in a spiral. My oldest was so taken with it that every time some one came over he had to show them The Apple Master.
It may be a uni-tasker but I love it and you can have one of your very own from William Sonoma, Amazon or Ebay.
I love love love this blog. Today Food In Jars is giving away The Ball Blue Book of Preserving (aka the canning bible). To enter go over there, comment and leave your favorite jam or preserves recipe. This is the one I am leaving:
Tomato Basil Jam 5 large tomatoes 1/4 cup lemon juice 1/4 cup chopped basil 1/4 cup sugar 1 2oz pkg of "no sugar needed" pectin 2 3/4 cup sugar
Remove skins, seeds if you want and chop tomatoes(once in the pot I use the potato masher on them), put in non-reactive pot, bring to boil, simmer for 10 minutes. Add lemon juice and basil. Combine 1/4 c sugar with pectin and stir into tomatoes, then add remaining sugar, heat to a boil, ladle into jars and process.
This jam is so good on biscuits, bagels, baguette and my grandmother likes it with cream cheese crackers.
I decided a couple of years ago that radishes are one of my favorite things to grow in my garden. The reason for my excitement over radishes is that you throw the seeds in the ground and very quickly you have little radish plants. Then you can eat the root (what we think of as a radish) and eat the greens (cooked with a little garlic and olive oil, trust me they are good). Last summer I learned about my favorite part of a radish that you can eat- the pod. I was telling my friend about my love of radishes and she asked me if I ate the pods too. What!? There's more to these little magic plants!? So I let my radishes bloom and they made pods. I tasted one right off of the plant and was immediately smitten. They have the texture of a fresh, raw green bean but the flavor of a radish. Because I will pickle anything, I knew these had to be pickled. I have since done a little research and have found that they are wonderful in stir fries too.
In my research I found that there is a variety of radish that is grown especially for the pods called rat tailed radish. Not a very pleasant name for such a lovely treat. This year we ordered our seeds from Baker Creek Heirloom Seeds and I was very excited to see they had rat tail radish seeds. We planted the french breakfast variety as well as the rat tail. I have been very happy eating the french breakfast with a little cold butter on bread (again, trust me, it is delish and makes the radishes taste sweet). The rat tail radishes have not disappointed at all. They are actually very pretty growing in the garden with small white and purple flowers. They are full of pods, I can hardly keep up. I have, of course, pickled and canned some and plan to stir fry some very soon.


 - I love my